
The Ins and Outs of Slitherlink
One of the most difficult Slitherlink puzzles I publish is the Laves Slitherlink, which you can find in its own collection, as well as in my variety slitherlink collection.
I recently helped a reader, Billy, solve one of these monsters, and I thought I’d share the tips here. We explored a handful of advanced solving techniques which I think you’ll find useful. These techniques apply to all Slitherlink puzzles, and not just the Laves puzzles.
Billy’s first letter started:
In the hundreds and hundreds of hours I’ve spent (I’m retired) I’ve become proficient at all the Slitherlinks varieties except Laves. I must be missing something. My Laves puzzles are no more than 50% solved when I find I have to begin making guesses (and seeing if they lead to impossibilities) and my guesses are more often than not inconclusive.
I asked Billy to send me a scan of a partially solved puzzle, and received this image of puzzle 5 from variety book 17 (here’s the original PDF, should you wish to try it yourself):
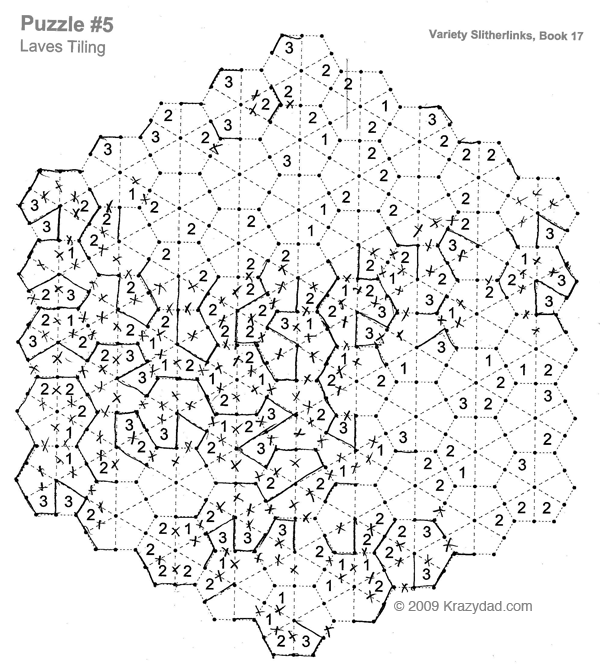
Looking at this, a fairly easy break popped out at me, so I highlighted a green edge to illustrate it:
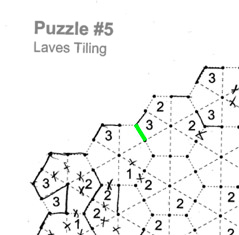
Figure 1.
Consider what would happen if the green edge were the sole open edge in the 3-cell to the right of it. You would not be able to fill in the remaining edge for the 2-cell to the upper-right. Therefore, since only one edge in the 3-cell can be open, that edge must be filled. Having filled that, you can make some more progress in that area (at least 14 more edges, maybe more).
Billy wrote “Duh!, How could I have missed that! That’s why I find these seemingly very finite puzzles are so elegant. There are so many deductive strategies to discover in such a seemingly simple space!” (Note to the reader: flattery goes far with me). Then Billy proceeded to make some more progress, and then sent me this:

At this point nothing easy popped out at me, so I grabbed a highlighter and invoked (drum roll please…)
The Rules of Innies and Outies
Or …
Topological Slitherlink Logic
Or …
The Highlighter Trick
Now, if you’ve ever solved one of these puzzles, you know that slitherlinks form closed loops, like a loop of string which has been pushed around on the paper.
1. A border cell which has a known closed border edge is an innie (it is inside the loop).
2. A border cell which has a known open edge is an outie (it is outside the loop).
We can call “innie” and “outie” inclusion states.
As you solve the puzzle, cells are either known to be innies or outies, or their inclusion status is unknown. When you’ve finished solving the puzzle, you will know all the cells’ inclusion states. Sometimes you can make progress by correctly identifying the status of a previously unknown cell, using the following rules:
3. If an innie touches an outie, the edge between them is filled (|).
4. If like touches like (innie+innie or outie+outie) the edge between them is open (x).
5. Filled edges (|) always separate innies from outies (or like from unlike).
6. Open edges (x) always separate like from like.
7. An island of outies must be connected to the outside.
8. All innie islands will ultimately be inter-connected.
Figure 2 helps to show how I applied this logic:
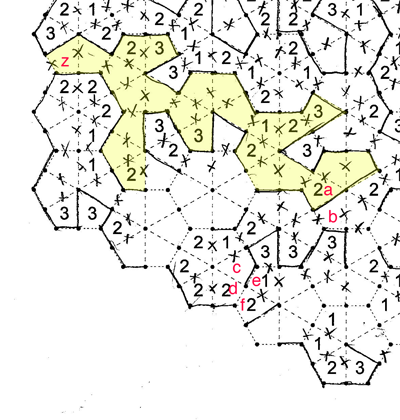
Figure 2.
You can see that the inclusion status of cell F is not immediately obvious, which is why it is unclear where the edges go in that area.
I’ve highlighted a set of outies in yellow. I know these are outies because Z has an open edge on the border (rule 2). The rest of the cells are connected to Z by Xs (open edges) (rule 6), so they must be just like Z.
Z is an outie because it has an open border edge.
A must be an outie because it is connected to Z.
B must be an innie because it is separated from A.
C must be an innie because it is connected to B.
E must be an outie because is is separated from C.
D is an innie, because it has a closed border edge (rule 1).
The edge between D and C must be open, because both are innies (rule 4).
This means the line between C and E must extend to go between D and F, as there is nowhere else to go.
Once this edge is drawn, you will see that F is an outie (rule 5). That’s how I originally spotted it, but you could also have figured it out more quickly by seeing that F is disconnected from cell B, which is an innie.
You can apply this logic without using a highlighter, but using a highlighter (or two highlighters) can make it easier to spot, so I sometimes grab one when I get stuck.
Billy was able to make use of the highlighter trick (using two highlighters, no less) and made significant progress on the puzzle. Then he sent me this, in which his progress is shown in red.
I asked Billy to look at figure 3 and consider if the edge under the question mark (near the bottom) can be filled.
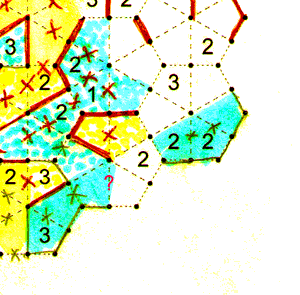
Figure 3.
It can’t, because then you wouldn’t be able to find two edges for the 2-cell that is east of it. Therefore you can eliminate the edge, which leads us to figure 4.
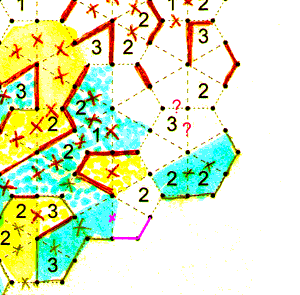
Figure 4.
In figure 4, imagine that the corner formed by the two question marks is filled in.
The corner can’t be filled in because again, you wouldn’t be able to solve the 2-cell to the north-east. Therefore, one of those edges must contain a gap, which means the opposite two edges in the 3-cell must both be filled, which gets us to figure 5.
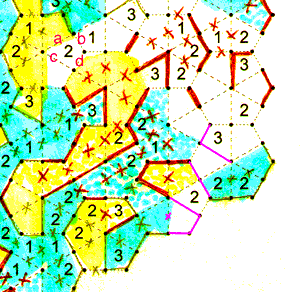
Figure 5.
Here, Billy made further progress by noticing the following:
“If the 2-cell, surrounded by the edges marked a,b,c and d is outie then a and d are unfilled, and, therefore, b and c are filled (to comply with the 2 of the 2-cell) – but the the southeast end of b has nowhere to continue because it can’t continue to d which we stipulated is unfilled and it can’t continue east because the 1-cell one associated with b already has one border edge filled, that is b. So our assumption that the 2-cell is outie leads to a contradiction, so the 2-cell must be an innie.”
Wow, pretty impressive! Billy’s logic got us to figure 6, from which further progress was made.
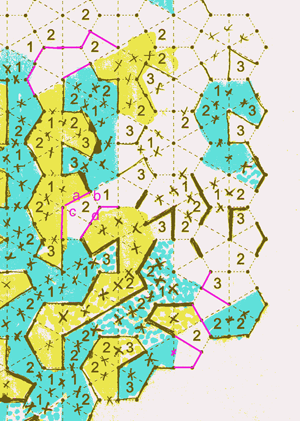
Figure 6.
With all these excellent strategies, Billy was able to complete the puzzle. However, he found that to complete the upper part of it, he ended up using some fairly lengthy trial-and-error approaches. He asked if there was a simpler way to go at it from the point shown in figure 7:
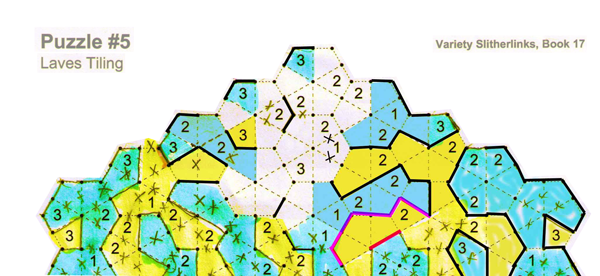
Figure 7.
I started by looking at stuff near the bottom, and also found I could only solve it with a lot of trial and error. But then I looked near the top and noticed a better way, which invokes.
The Rule of Intersections
Laves slitherlinks can seem especially tricky because of those 6-way intersections. But all intersections can be tamed with this rule. Look at the intersection with edges labeled a thru f in figure 8.
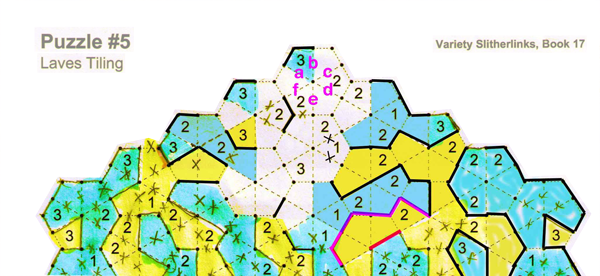
Figure 8.
The rule: Every intersection, if it is used at all, has one incoming line, and one outgoing line.
I know that (a or b) must be one of those lines, because it is the remaining line in the 3-cell. I know that (f or e) must be one of those lines, because it is the remaining line in a 2-cell.
This means, both (c and d) are empty, so I can X them out and fill in the rest of the 2-cell that they both touch. Then we can fill in a bunch of stuff, which gets us to figure 9.
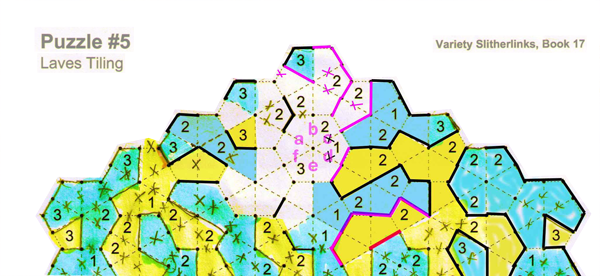
Figure 9.
In figure 9, we can invoke the rule of intersections once again. We know that B must be filled, looking at the 2-cell that abuts B and C. Line B must go into the 3-cell that abuts F and E. Therefore the opposite corner of the 3-cell can be filled, and a few more things, which gets us to figure 10.
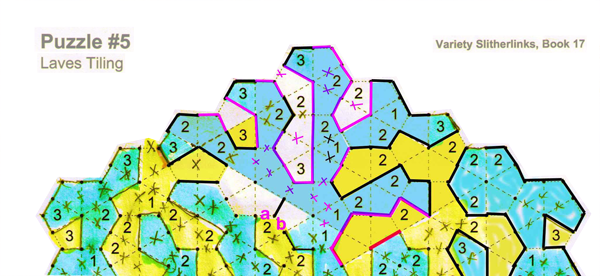
Figure 10.
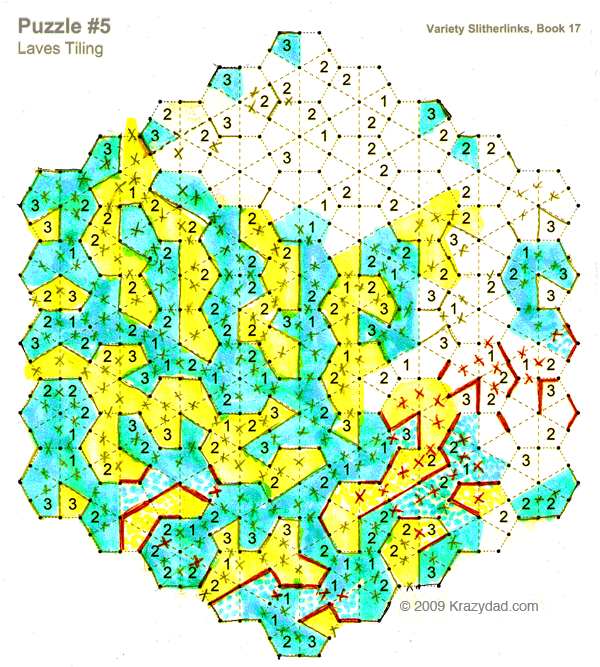
Now I’ve filled in enough stuff that the rest of the puzzle falls pretty easily. Because of the rules of innies and outies, I know that the yellow region which is connected to A,B must extend and connect to the other open yellow region. There is only one way to do this.
At this point, I had enough material to write a long tutorial for my blog, and you are reading it.
Happy solving!
